
很多刚入行的结构工程师,一拿到项目就打开软件疯狂建模,曲面画得很丝滑,结构看着很饱满,结果一到试模问题满天飞,装配干涉、壁厚缩水、脱模困难、量产异响,最后改模改到崩溃,锅也甩不掉。
真正成熟的结构设计,从来不是比谁画得快,而是思路清晰、逻辑闭环、面向量产。今天就把从项目接手到最终落地的完整设计思路,一次性讲透,不管是消费电子、小家电还是智能硬件,都能直接套用。
一、先吃透需求:方向不对,努力全废
动手建模前,至少花半小时把项目需求扒得明明白白。
先问自己几个核心问题:
产品用在什么场景?手持、桌面、车载还是户外?有没有防摔、防水、耐高温等可靠性要求?IP 等级做到多少?成本控制在什么区间?是高端走质感,还是性价比走量?预计年产量多大,对模具结构、装配效率有没有硬性要求?有没有安规、专利、尺寸上限限制?
结构设计不是纯艺术,所有方案都要围绕需求展开。
一个户外三防产品和一个桌面摆件的设计逻辑天差地别,需求没搞懂就画图,后面只会无限返工。
二、评审 ID 方案:先给颜值 “做体检”
ID 追求好看,结构追求能做,两者天生存在矛盾。
拿到外观模型,第一步不是顺着曲面做壳,而是结构可行性评审。
重点看这几点:有没有拔模角度?有没有无法脱模的倒扣死角?壁厚是否均匀,是否存在局部过厚导致缩水?外观分缝位置是否合理,是否影响装配和强度?特殊曲面和造型是否会导致模具成本飙升、难以加工?
有风险一定要提前提出,给出优化建议,并同步留痕。
不要等开模后才说 “做不出来”,那时候所有压力都会落在结构身上。

三、内部堆叠排布:结构是产品的 “骨架”
结构不只是外壳,更是内部所有零件的载体。
在做外壳之前,先把内部空间规划清楚:
把 PCB、电池、摄像头、马达、喇叭、接口等核心元器件全部按 3D 占位,优先保证关键器件空间;预留天线净空、散热通道、线材走位空间;规划螺丝柱、卡扣位置,避开元器件干涉。
遵循一个原则:先大件后小件,先固定后活动,先结构后外观。
堆叠顺了,后面结构设计基本不会出现颠覆性修改。
四、确定分壳与固定方式:架构定好,事半功倍
架构是结构设计的灵魂,直接决定产品强度、成本和装配效率。
核心就三件事:怎么分件、怎么固定、装配顺序是什么。
分壳方式常见有上下盖、前后壳、中框 + 后盖等,外观缝要尽量隐蔽,同时方便装配。固定方式优先选择卡扣,减少螺丝数量,降低成本;受力大、有防水需求的产品,采用螺丝 + 卡扣组合;低端低成本产品可直接全卡扣设计。装配顺序要从内到外、从下到上,一次装配到位,不反复拆装。
架构合理,后面的细化工作会非常顺畅;架构草率,后期全是补丁。
五、细节结构设计:决定产品稳不稳定
这部分最考验功力,也是量产问题的重灾区。
设计时牢牢抓住几个关键点:
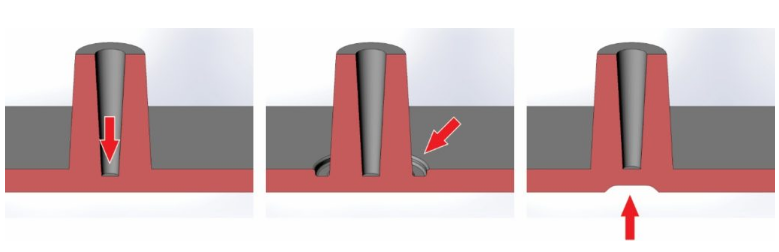
保证壁厚均匀,避免厚度突变,加强筋厚度控制在主体壁厚 1/2~2/3;螺丝柱根部做火山口减胶,防止外观面缩水;所有胶位面给出足够拔模角度,不给模具制造麻烦;孔位、活动部件预留合理间隙,避免卡死或松动;防水结构优先做胶圈槽 + 限位,不单纯依赖打胶;避免尖角、薄钢、应力集中区域,提升产品强度。
高手做结构,从来不是越复杂越厉害,而是越简单、越稳定、越不容易出错。
六、面向模具与量产:设计要 “接地气”
很多图纸在电脑上完美无瑕,一到量产就原形毕露。
结构工程师画图时,脑子里必须同时有模具和产线。
思考分型线是否顺畅,有没有薄钢、尖钢风险?顶针位置是否合理,会不会出现顶白?能否减少斜顶、行位等复杂结构?工人装配是否简单高效,是否适合自动化生产?材料是否通用,采购和注塑是否方便?
只追求建模效果、不考虑生产落地的设计,都是无效设计。
七、校核验证 + 流程留痕:最后一道 “保命防线”
方案完成后,不要急着出图。
先做全面自检:干涉检查、壁厚检查、拔模检查、间隙校核;
再完善图纸规范:明确材料、公差、表面处理、装配要求;
关键项目通过手板验证装配关系、结构强度和手感;
所有沟通、方案变更、评审意见,全部流程留痕。
结构设计不怕出问题,怕的是没依据、没记录、最后莫名背锅。
结语
一套完整的产品结构设计思路,总结下来就是:
先懂需求 → 评审 ID → 规划堆叠 → 确定分壳与固定 → 细化结构细节 → 面向模具量产 → 校核验证留痕。
按照这个流程走出来的结构,不一定最惊艳,但一定少改模、少问题、好装配、易量产,既能保证项目顺利推进,也能让自己远离无妄之锅,真正做到高效、专业、省心。
Many entry-level structural engineers jump right into modeling when they get a project, creating smooth curves and full structures, only to be hit with assembly interferences, wall thickness issues, demolding problems, and production noise, leading to endless revisions and blame.
Mature structural design isn’t about speed — it’s about clear logic, closed loops, and production-ready execution. Here’s the complete workflow from handoff to delivery, applicable to consumer electronics, small appliances, and smart hardware alike.
I. Nail the Requirements: No Direction, No Progress
Before touching CAD, spend 30 minutes dissecting the project brief. Ask yourself:
What’s the use case? (Handheld, desktop, automotive, outdoor?)
Any reliability demands? (Drop-proof, waterproof, heat-resistant?) What IP rating?
Budget range? Premium vs. high-volume?
Annual output? Does it impact mold structure/assembly efficiency?
Regulatory constraints? Patents? Size limits?
Structural design isn’t art — it’s driven by requirements. Outdoor rugs and desk toys require radically different approaches. Ignore them, and you’ll loop forever.
II. Vette the ID Proposal: Give Looks a “Physical Exam”
ID teams want beauty; we need feasibility. Don’t blindly follow the model. Check:
Draft angles? Undercuts? Wall thickness uniformity?
Are split lines logical for assembly and strength?
Flag risks early and suggest fixes — don’t let “can’t be built” come after the mold is cut.
III. Internal Stacking: The Product’s Skeleton
Structure isn’t just the shell — it holds everything. Plan internals first:
Layout PCB, battery, camera, motor, speaker, ports in 3D — prioritize critical components.
Reserve space for antennas, heat sinks, wiring routes.
Position screw bosses and snaps away from hardware conflicts.
Rule: Large parts first, fixed parts next, externals last. A well-stacked core prevents redesign disasters later.
IV. Define Shelling & Fastening: The Backbone of Success
The architecture determines strength, cost, and assembly ease. Key decisions:
How to split the enclosure? (Top/bottom, front/back, frame/cover?) Hide seams where possible while enabling easy assembly.
Assembly sequence: Build from inside out, bottom up. Avoid repetitive disassembly.
A flawed architecture multiplies errors; a solid one simplifies everything.
V. Detail Engineering: Where Stability is Born
This is where pros shine — and where novices fail. Focus on:
Volcano-shaped bottoms on screw bosses to prevent surface sink.
Adequate draft angles to avoid demolding issues.
Proper clearances for moving parts and holes to prevent jamming or rattling.
Waterproofing via groove + gasket, not just glue.
Avoid sharp corners, thin edges, or stress concentrators that weaken the product.
Simplicity beats complexity — less is more.
VI. Mold & Production Awareness: Grounded Design
Beautiful CAD doesn’t mean manufacturable. Always think:
How does this flow to the mold? Any thin edges or steel interference?
Are ejector pins well-placed?
Can we minimize expensive sliders or lifters?
Is assembly worker-friendly and automation-ready?
Are materials standard and easy to source?
Designs that ignore production are doomed.
VII. Final Checks & Documentation: Your Liability Shield